
Containers are a really fun way to garden! You can bring annuals, perennials, or even include your houseplants in them! Even the pot you choose can bring character to your garden.
Sometimes container gardening can be a mystery though, getting plants that will work well together aesthetically and care-wise!

I will go over general design tricks to make your container look its best today, and even suggest some unique ideas to spice up your container designs!
The most important part of container gardening is to use plants that YOU like! You wont enjoy your creation unless you like the plants and design, so overall, just have fun with it!
Containers
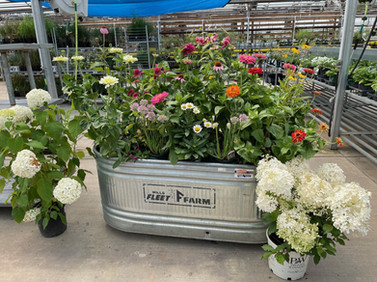
The first step is to choose your container. There are many many types out there, and you can go as basic or as extravagant as you'd like. You can stick with a simple plastic pot from the nursery or one that is leftover in your garage, or you can buy a big, fancy urn to adorn your front steps. Everything in between is offered as well, ceramic, metal, terracotta clay and earthen containers made to be composted after a year of use.
You can even use items that aren't MEANT to be planters as planters (I've seen old toilets, bathtubs, whiskey barrels, as well as various dishes used as planters!
If this is a part of the designing process that is fun to you, feel free to get creative with it!

Filling your container with soil is also an important step. I recommend regular potting mix for the entire container. (The only exception would be if you're doing succulents in your pot - then, use a looser succulent soil). I also recommend replacing at least the top 1/3 of your soil each year. The soil gets depleted of nutrients throughout the growing season, so refreshing your soil each year is going to benefit your plants immensely.
If your pot is so huge and heavy that the plant's roots would never reach the bottom, you can fill the bottom of the pot with something to fill space. You could use packing peanuts, wood scraps from your yard, leaves, or one of those false bottoms that sits halfway down your pot, leaving the bottom as empty space. This would make your pot lighter, and easier to fill with soil, as there would be less space to fill with it. Just be careful if there are strong winds that your pot isn't going to tip over if it's too top-heavy.
Right plant, Right place
An important step in planning a container garden is to figure out where your container will be placed. Will it be sitting in the sun for most of the day? Or will it be shaded by your house for most of the day. Pay attention to the areas around your house and notice how much sunlight it gets throughout the day.
See our blog about sun conditions to see what category your space falls under!
Also notice - will your pot be below a gutter (or lack, thereof)? Will it be getting wet when it rains, or will it be protected under an awning? These conditions will help you decide what plants to use in your container.
You'll want to keep these conditions in mind when shopping for your container plants. Know if your spot is in full sun, or part shade. Know if your spot will be dry often (if its not in a convenient spot to water) or if it will stay wet. Usually, garden centers have the plants labeled with sun requirements and any watering preferences that you can look for.
Picking Plants
Now that you know your conditions and you have your pot, you'll be able to start the fun part... picking your plants!
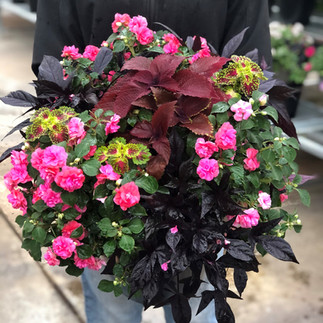
A common design tip when creating container gardens is to use the Thriller, Spiller, Filler rule of thumb.
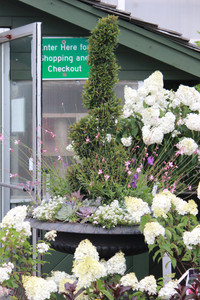
Thrillers are tall, focal points that catch your eye when you first look at a container garden. Examples include ornamental grasses, canna lilies, spikes, or even a vine climbing up a trellis!
Spillers are plants that will trail over the side of your pot, creating interest that way. These can be flowering or greenery, and there are lots to choose from! Examples include ivies, alyssum, goldilocks vine, or sweet potato vine.
Fillers are meant to fill in the space between your tall thriller and your low spiller. These can be flowering or greenery as well, and have the least guidelines to them. Examples are all over the map from coral bells, marigolds, and petunias, to daisies or asparagus ferns.
You don't have to use this rule of thumb, but it is a great starting point when designing your containers!
Picking your plants from scratch can be intimidating or overwhelming! If it helps you, you could pull some pictures from the internet or that you've taken of other containers and try to emulate them using plants at your nursery. I like to set the plants next to each other on my shopping cart so I can visualize all the colors and textures together. I usually end up changing my mind several times before I land on my final choices. This is the fun part, so take your time!

Using Unique Plants
Don't be afraid to mix "sections" of the garden center as well. You aren't necessarily limited to annuals.
You can use perennials in your containers, and take them out at the end of the growing season and plant them in the ground! If you want to re-use it in a container the following year, just bury it in a plastic pot to keep the roots contained. The ground will keep the roots warm enough to survive the winter, and the pot will keep the roots together so you can pull it out next spring and use the plant again!
Succulents can be used in containers too! Be careful with the placement of your pot, as the succulents need LOTS of sunshine and not a lot of water. Just make sure you're using all succulents, or pairing succulents with plants that can handle drought well.
You can use your houseplants as parts of your containers as well. Houseplants like being placed outside in the summer, assuming you have the right conditions for them. Most houseplants don't like direct hot sunlight, they want to be shaded, so if you have a shady spot, feel free to try a fern or an ivy, even flowering houseplants like caladiums or begonias! You could do an arrangement of your houseplants in a container, or mix a houseplant in with other shade-loving plants like impatiens, other begonias, or torenias!
Even using statues, birdbaths or stakes in your container can bring unique designs to your containers! Maybe a bunny statue is peeking out from your filler plants, or maybe a small birdbath is your focal point, surrounded by flowers! Just because something isn't growing from the soil in your pot, doesn't mean it can't go there!
Planting your Plants
Once you have your plants picked out and your container filled with fresh soil, its time to plant! I like to arrange my plants loosely on top of the soil first, then take the plastic pots off and fill in the soil around the roots once I have an arrangement I like.

Keep in mind that your plants are going to grow. They won't always be as small as they are when you plant them. Read the tags of the plants you pick out to make sure that you know how tall they will get eventually, and plan your arrangement accordingly! Similarly, your plants will grow wider as well. You may want to leave soil visible when the plants are first planted so that they have space to grow into. However, if you want that full look right away, just know that some of the plants will outcompete each other throughout the summer, and you may lose some plants.

You can use any planting method you like, just make sure the roots are covered with fresh potting soil in the end.
Care
Fertilizing: Fertilizing is important to provide good nutrients to your plants to keep them looking their best for the whole summer. You can use any fertilizer you'd like. My favorite method for fertilizing is to use a granular, slow-release fertilizer that I sprinkle on top of the soil after planting. It will slowly release fertilizer into my container when I water it, and I don't have to worry about mixing anything in a watering can throughout the summer.

Deadheading: Deadheading is an important part of caring for your container gardens as well. Once a bloom or leaf is not looking its best, cut it off! This will promote new growth for more flowers and leaves to fill in! See our blog about how to deadhead for details about this!
Water: Watering is arguably the most important part of caring for your container gardens. With Minnesota's recent hot and dry summers, watering is the best way to keep your plants alive! You can get a moisture meter if you want to check the soil moisture level down where the roots are, but usually you can tell if your container needs water. If it is a smaller planter, pick it up and notice how heavy it is when it is wet and when it is dry. You'll learn when your planter needs water that way. If your planter is bigger, stick a finger in the soil, about an inch down. If it is dry, your container probably needs water. Your plants will tell you if they are thirsty too. If they are wilting, definitely water them right away! They should perk back up if they're not too far gone. During the hot spells in July and August last year, my planters at my house needed water every single day.
Containers are a really fun way to garden! We'd love to see photos of your containers you made, so tag us on social media if you post any!
Keep going and keep growing!
Chantel












Commentaires